Yay, another of my high quality tutorials. :D This one was destined to be a success, as I started it quite late one evening (as you will see from some of the photos), and it could've gone either way:
Making myself something to wear = 1 point
Choosing a project which relies on cutting things out neatly = -1 point
Naked flame! = 10 points
Stinky glue: = -20 points
I will give myself a bonus point for taking at least some effort to document my blundering about in semi-darkness with flammable fabric near a lit candle though.
I've seen a lot of those fabric flower brooches (rings, earrings, necklaces, hair accessories, etc.) around and about, and I fancied having a go at making myself one (I even have a Pinterest board just for fabric and paper flowers). I made a ring a while back using someone else's tutorial, and decided to make my own. If you want to make yourself one, you can follow my sort of instructions below.
What you will need:
Flammable fabric: chiffon, silk, satin - test a scrap of fabric to see how it burns before cutting it out.
Scissors
Fabric glue
Stinky glue for metal/plastic (optional)
Needle and thread (same colour as fabric)
Brooch back
Beads or buttons for centre
Small piece of felt
A source of flame such as a candle - I have also done with with a cigarette lighter, the candle is easier to control.
Tweezers (if you are nervy/clumsy/have delicate fingers
Decide on the size of the flower you want to make. I decided on a brooch, which has a diameter of about 2 inches. You could make smaller flowers for a ring, or even earrings.
Cut out several circles of fabric. For the brooch, my circles varied in size from 2 inches down to the smallest, which is about an inch.


Note: If you want to test the edge of the fabric to see how it feels, leave it a second or two to cool down before touching it. Don't ask me how I know this.


![]()
Making myself something to wear = 1 point
Choosing a project which relies on cutting things out neatly = -1 point
Naked flame! = 10 points
Stinky glue: = -20 points
I will give myself a bonus point for taking at least some effort to document my blundering about in semi-darkness with flammable fabric near a lit candle though.
I've seen a lot of those fabric flower brooches (rings, earrings, necklaces, hair accessories, etc.) around and about, and I fancied having a go at making myself one (I even have a Pinterest board just for fabric and paper flowers). I made a ring a while back using someone else's tutorial, and decided to make my own. If you want to make yourself one, you can follow my sort of instructions below.
What you will need:
Flammable fabric: chiffon, silk, satin - test a scrap of fabric to see how it burns before cutting it out.
Scissors
Fabric glue
Stinky glue for metal/plastic (optional)
Needle and thread (same colour as fabric)
Brooch back
Beads or buttons for centre
Small piece of felt
A source of flame such as a candle - I have also done with with a cigarette lighter, the candle is easier to control.
Tweezers (if you are nervy/clumsy/have delicate fingers
Decide on the size of the flower you want to make. I decided on a brooch, which has a diameter of about 2 inches. You could make smaller flowers for a ring, or even earrings.
Cut out several circles of fabric. For the brooch, my circles varied in size from 2 inches down to the smallest, which is about an inch.
OK, so they don't need to be ultra neat, OK? Circle-ish will do. Don't judge me.
I can't remember what stone this candle holder is made from.Amazonite? Is that even a real thing? I'll go and Google, you carry on reading....
Now for the fun part. Carefully hold one of the circles near your flame source so that the edge of the fabric starts to melt slightly. Don't put the fabric right into the flame, it will just melt (or catch fire!).
The edge will melt and harden slightly, which causes the fabric to form a nice dome shape. You need to keep the fabric moving fairly quickly so you don't melt it too much, and also to keep the shape nice and circular.
Note: If you want to test the edge of the fabric to see how it feels, leave it a second or two to cool down before touching it. Don't ask me how I know this.
The resulting fabric circle should look something like this:
You can take it a little further to scorch the fabric if you like that look.
Repeat the process for all of your fabric circles. You should now have a dinky pile of circley domes:
It's starting to take shape now, see? *hops excitedly from foot to foot*
Arrange the circles in a pleasing shape, then sew them together with a few small stitches.
Choose something to go in the centre of your flower.
Note: if you are using beads, or a flat-backed button, you can sew that into place to anchor the fabric circles in place all in one step. Nifty!
I chose the black button on the far right. I removed the plastic shank from the back, sanded it a little, then used the stinky glue to stick it into the centre of the flower, covering the stitching. Leave glue to dry.
Once glue is dry, glue a small felt square to the back of the flower, to cover the knot and stitches. It also gives you a more stable surface upon which to attach the brooch back.
Glue brooch back in place and leave to dry. You could probably leave out the felt backing square if you were making a ring or earrings.
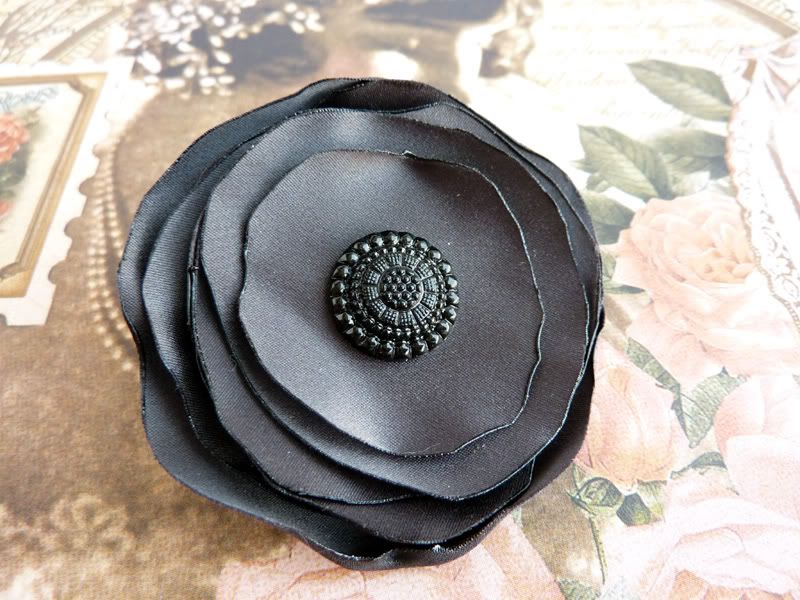
The finished article!
Comments
Post a Comment